To optimize the performance of a Counterbalance loom it is important to adjust the position of the warp threads in relation to a number of parts of the loom.
A Counterbalance loom operates by balancing a number of forces and ensuring the the shafts and beater are set up at the proper "neutral" height ensures the forces to lift and lower shafts are the same and are minimized to make sure the shed size is maximized with the smallest effort. It is important to note that the Counterbalance mechanism , unlike a Jack or Countermarch loom, needs the warp tension to operate properly. Treadling an un-warped Counterbalance loom makes the loom appear to be broken unless the operator puts their hand on the top of the shafts and applies a little downward pressure to simulate the warp tension as shown in this video.
This guide describes the steps involved for the Fanny and Mira; the two most common Leclerc models but also provides information that helps in adjusting other Leclerc Counterbalance models like the Colonial, Colonial I, Nilus II CB and Inca.
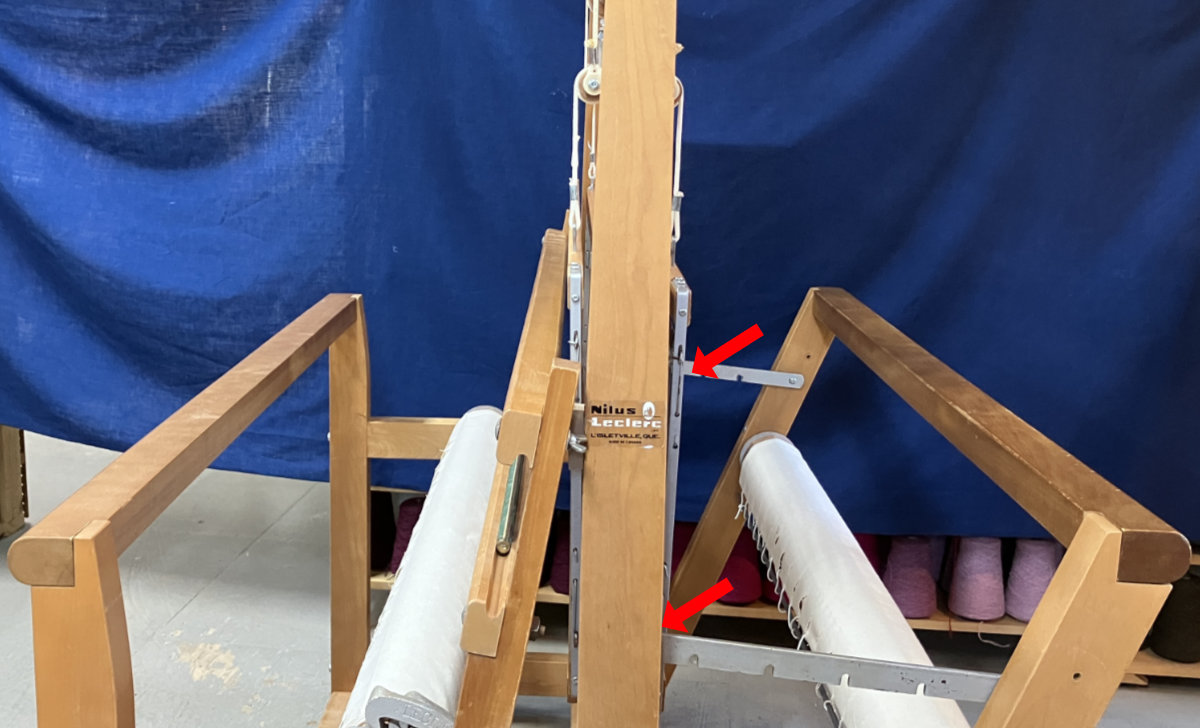
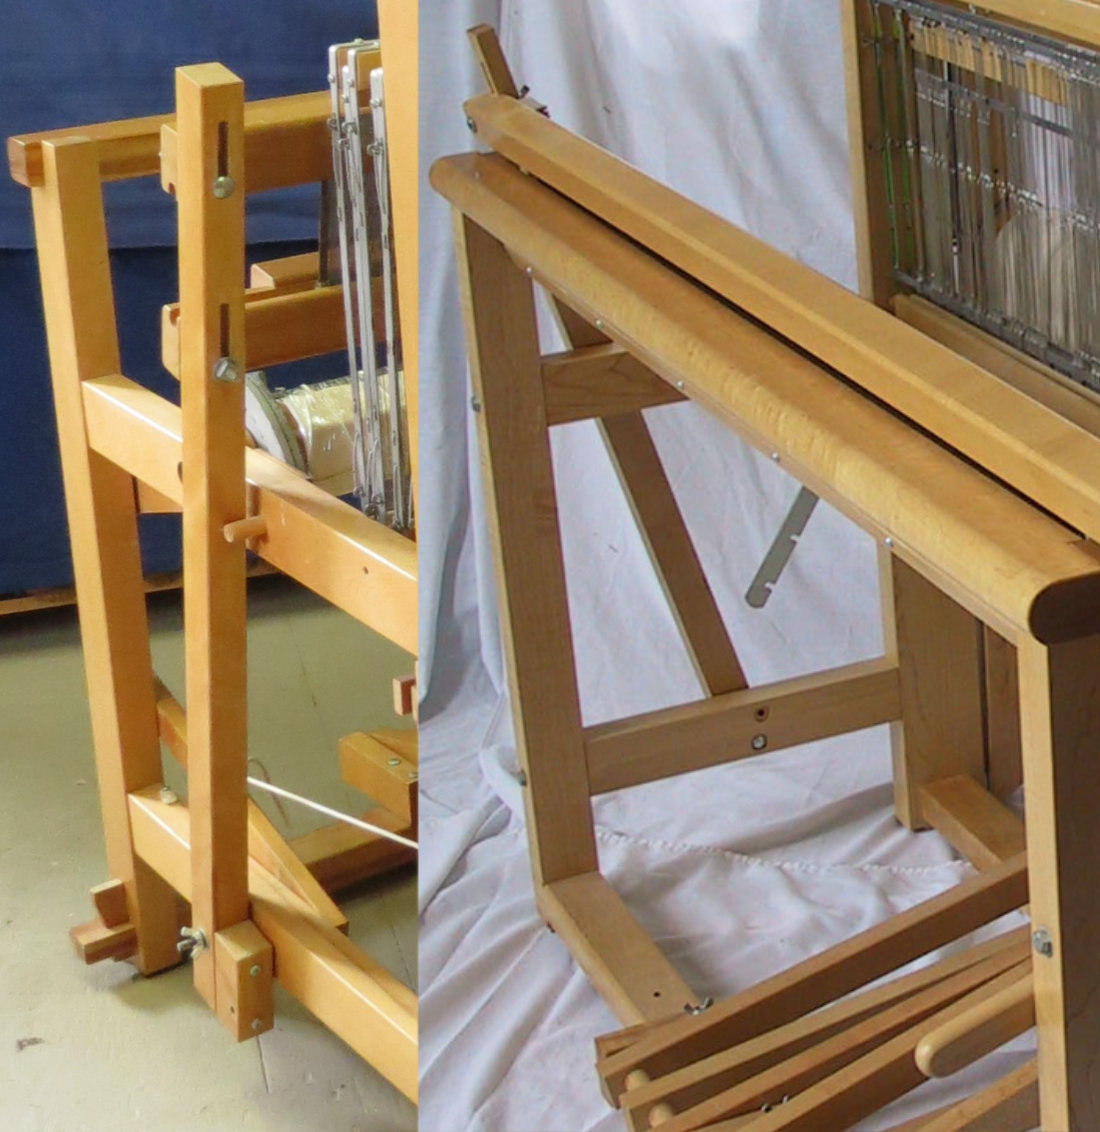
On looms like the Fanny, Colonial and the Nilus II Counterbalance model the back beam can be folded in to reduce the depth of the loom for storage or transport. The first step is to open up the loom folding the back beam out to the weaving position. By loosening a screw or bolt on the vertical posts, the metal "hook" can be released from the inner notch and the back beam can be folded out so it is away from the vertical castle. On most models including the Fanny, the furthest notch that maximizes the loom depth is the correct setting to use while weaving but it is important to check the manual to verify this. For looms like the Colonial which can be configured as a Jack or Counterbalance there are different hook settings.
Often weavers mistake the other notches on the metal hooks as being there to provide alternative settings for the backbeam position to use when weaving but this is incorrect. They are there to allow the loom to be folded up when there is a very large warp on the warp beam or the loom is configured with sectional rakes and can't be completely folded.
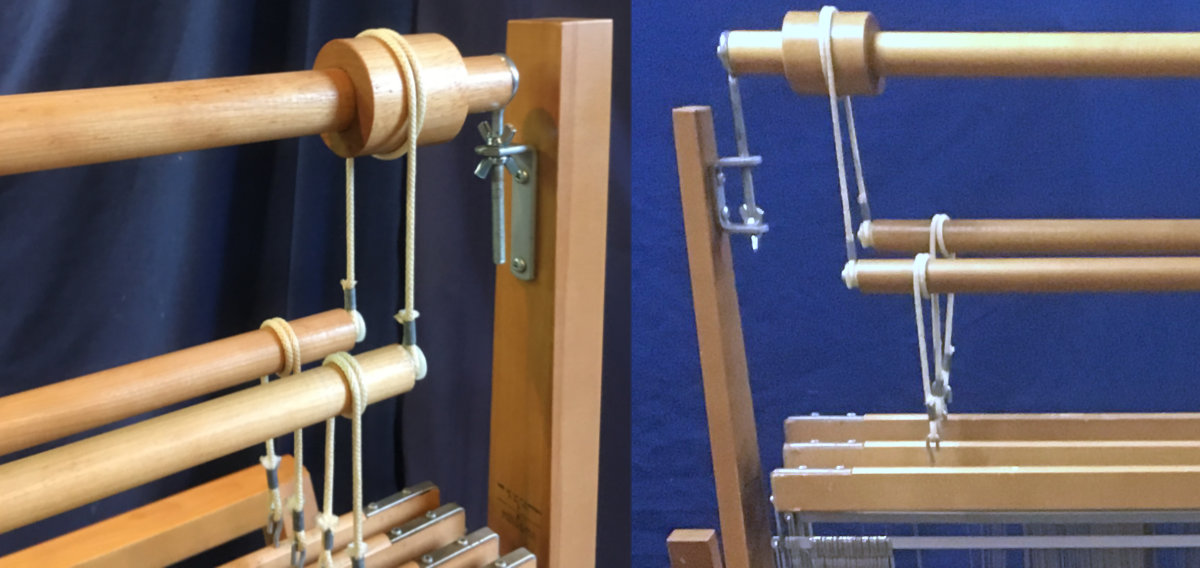
The pair of lower rollers are connected together with Upper Cords between the two at each end. These are wrapped once around the thicker sections of the upper roller. The shafts are then connected to the lower rollers by wrapping the Lower Cords around them and attaching the ends to the hooks on the top of the shaft frames.
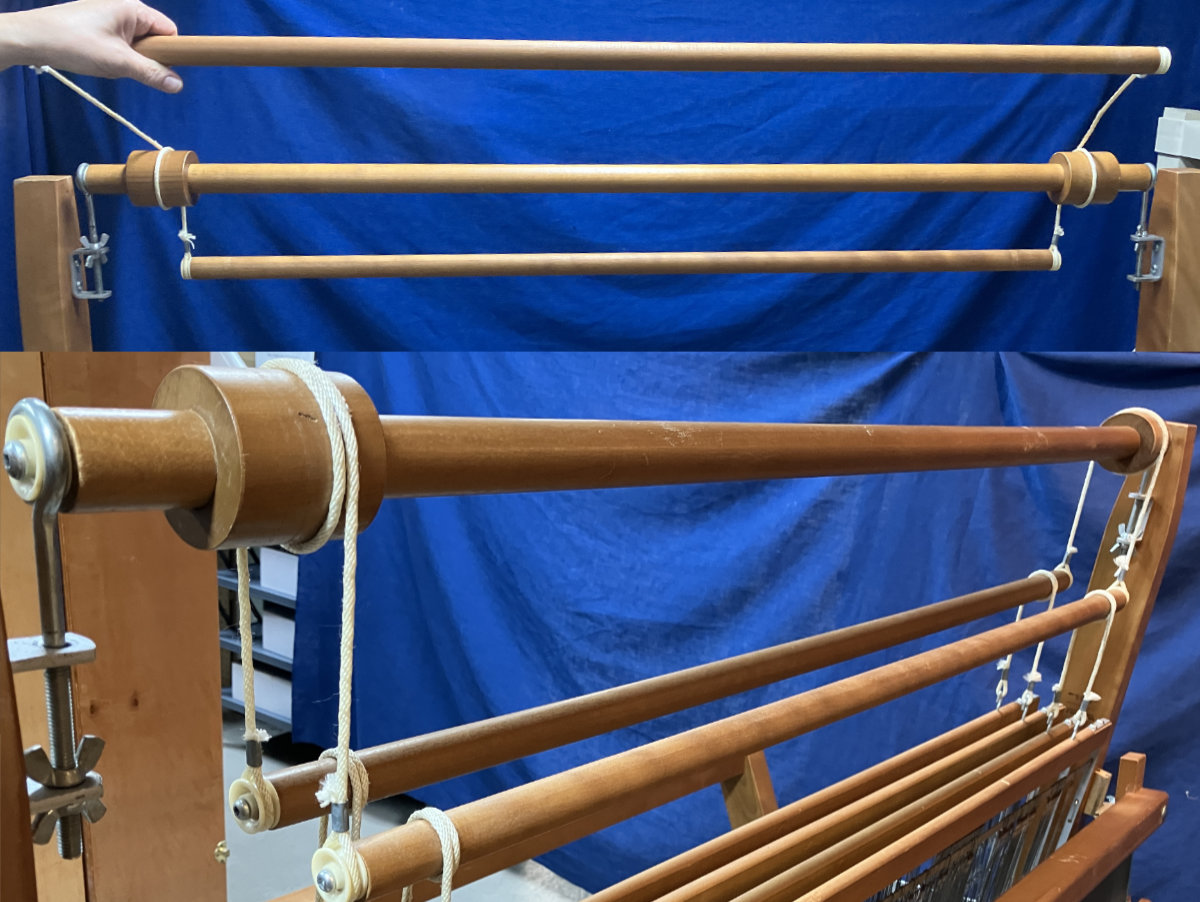
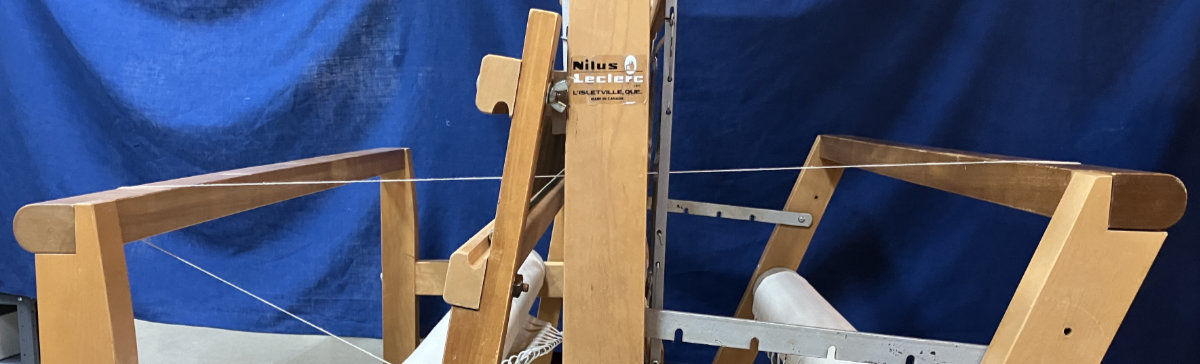
Note: The Counterbalance roller mechanism at the top of the loom has been improved over the years to try to make sure the force required to turn the rollers is minimized. This has been by improving how the cords attach to the rollers and how the upper roller attaches to the frame. If the rollers do not turn easily, the extra force required will make the loom harder to treadle and may affect the size of the shed available to the weaver. It is important to make sure that the rollers turn easily and more information on improving this can be found here. With the loom open, place a straight-edge between the front and back thread beam or run a tensioned string between the two beams. This should not go through a Heddle eye but pass beside them. If a ruler is used, it may be necessary to loose the wingnuts on the upper beater batten and move the reed over so there is a clear path between the beams.Check the Shaft Height
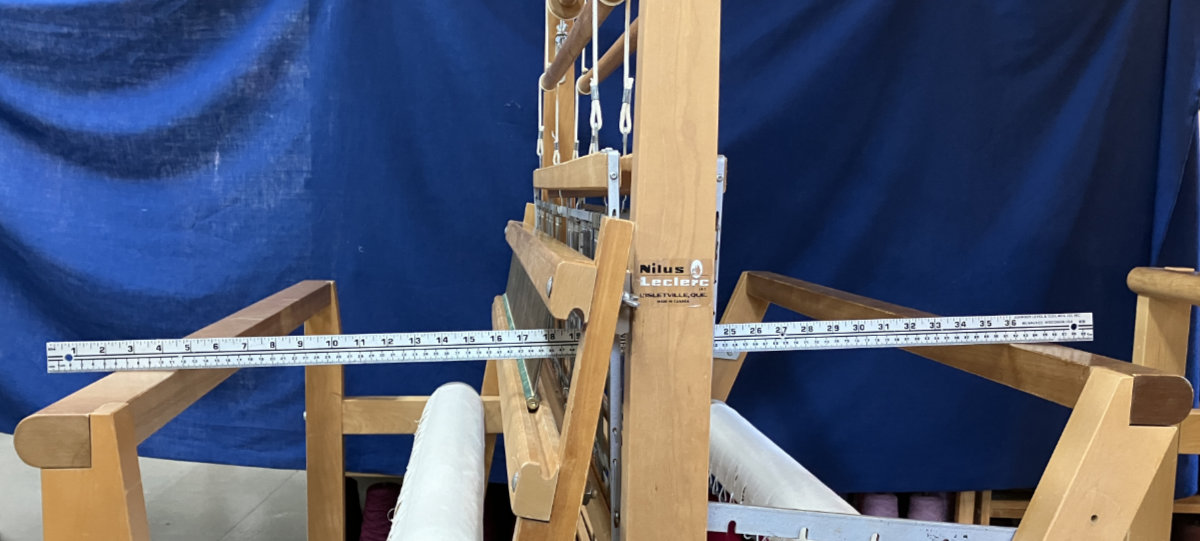
After the straight line between the front and back beam is established, hold the Shaft Frames so they are level in the "shed closed" position and determine where the Heddle eyes are in relation to the line. The vertical center of the Heddle eyes should be set at this line. If the Heddle eye is lower the shafts should be raised and if higher than the line the shafts need to be lowered.

Because the roller mechanism used on Leclerc Counterbalance loom has changed over the years, there is a different way to adjust the shaft height for each type of loom. To see these changes and determine which model you have see our Guide to Leclerc Counterbalance Mechanisms.
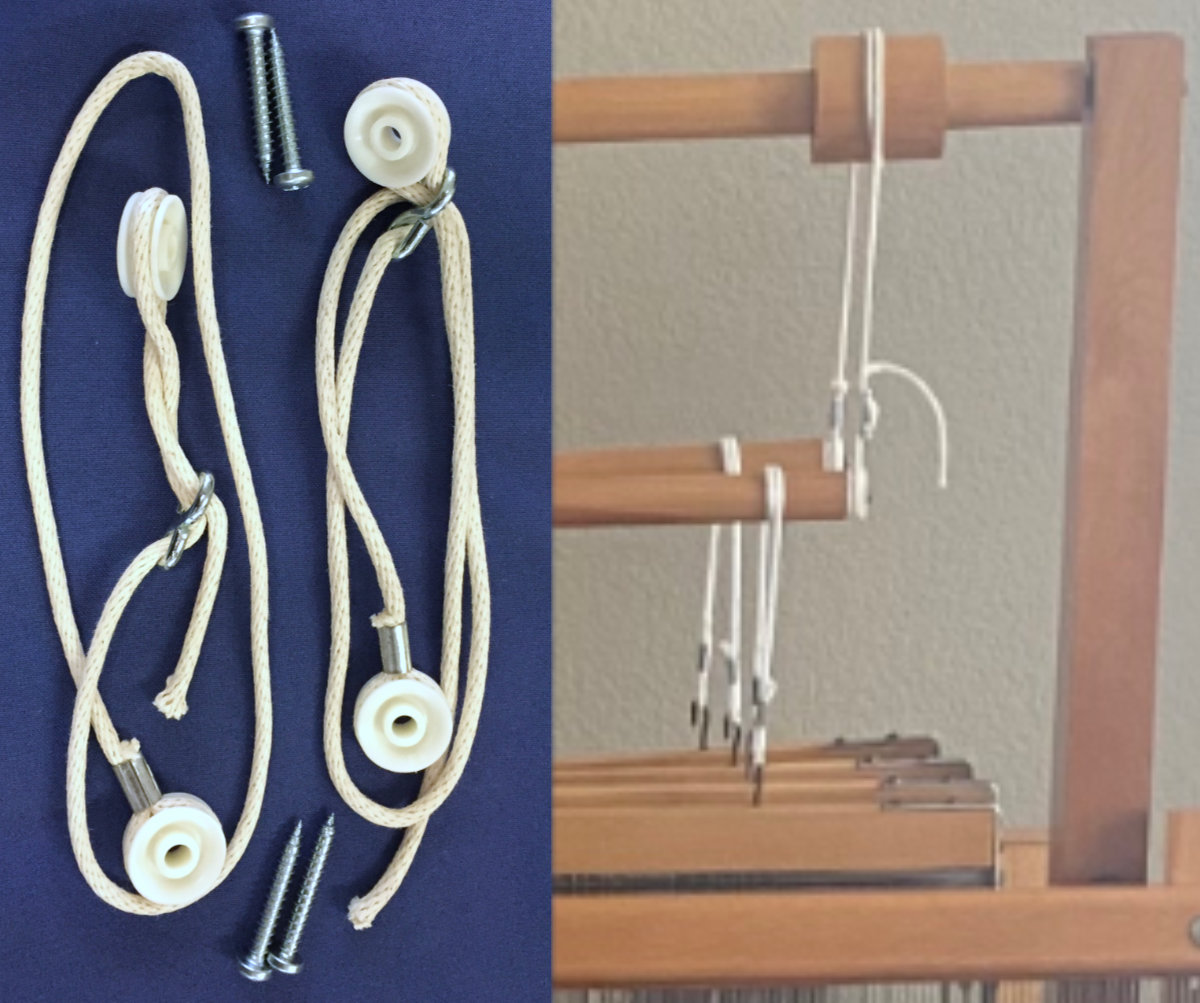
On older versions of the Mira and Fanny (and M and F Type) looms the upper roller was was set at a fixed height at either side of the loom frame. On these looms, a special set of adjustable upper cords can be lengthened or shortened to adjust the distance between the upper and lower rollers which would also change the shaft height. It is important to make sure both cords are adjusted to the same height so the shafts are level across the width of the loom.
Note that these looms can usually be updated to the improved design either by installing Upper Roller Mounting Brackets and either shortening or replacing the upper roller. Another option is to upgrade to a Shed Regulator which also helps with unbalanced weaves.
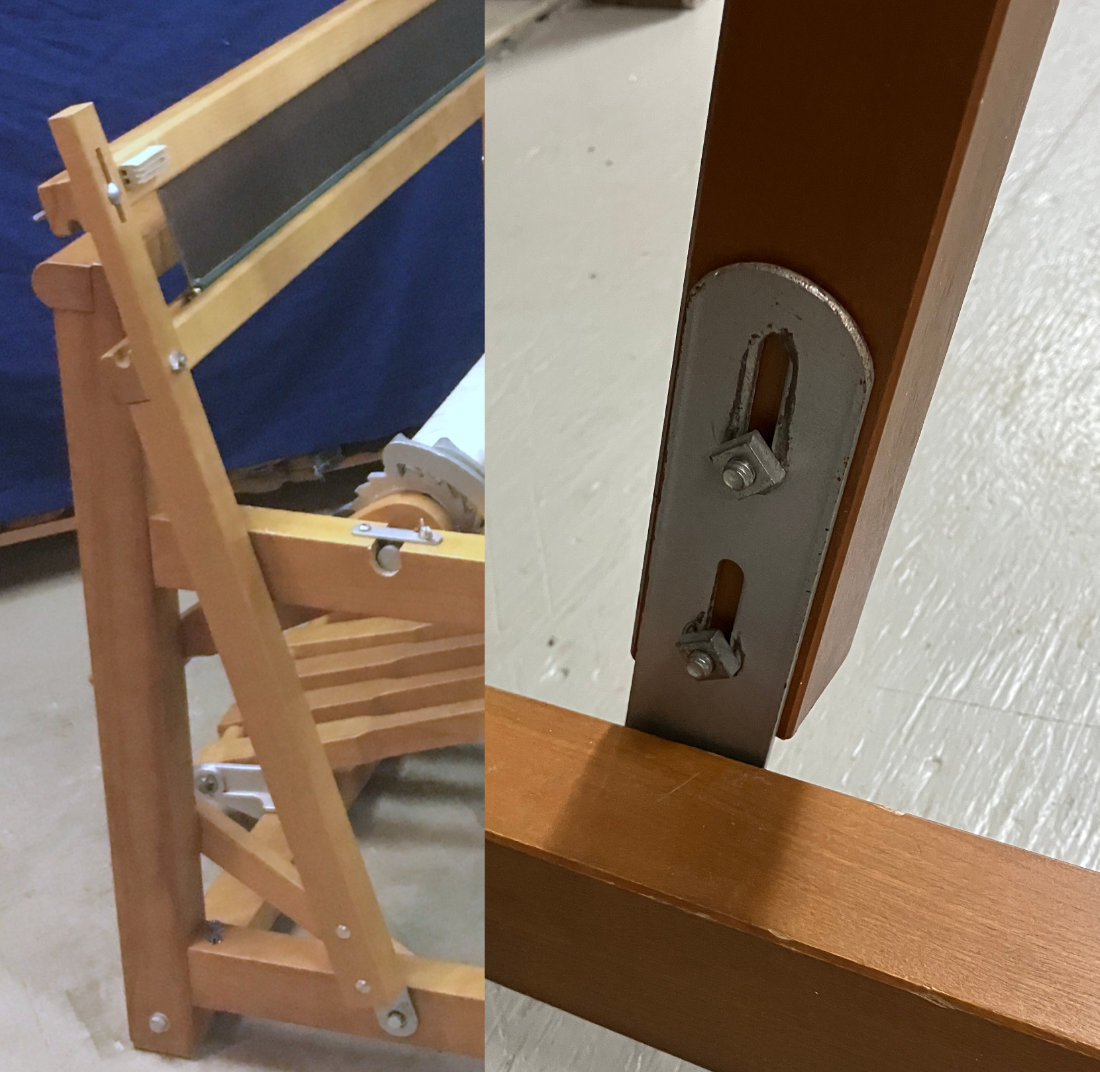
For looms with Upper Roller Mounting Brackets, adjusting the height of the shafts is fairly easy. By loosening the pair of wingnuts on each side the threaded nylon "bearing" can be raised or lowered and then locked in place by retightening the wingnuts. As with the cords it is important to adjust both sides to the same height.
On many of these newer models there will be a mark on the side of the uprights indicating at what height the shafts should be set to making it easier to position them.
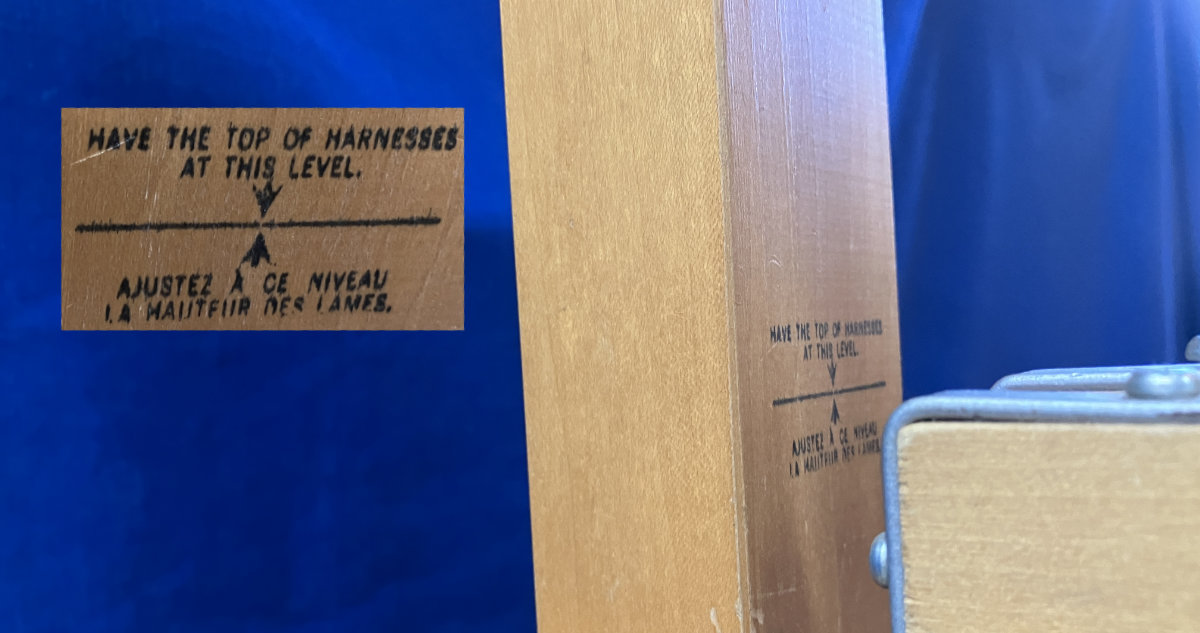
If the loom is a newer Fanny II, Mira II or Nilus II CB with a Shed Regulator, or this option has been added to an older loom, the height of the shafts is set in a similar fashion to the Adjustable upper roller but the roller is positioned by adjusting the connection of the cord to the spring. The s-hook on the end of the spring should be connected to the cord so that when the shafts are all level, they are at the line indicated on the side of the castle. If there is no line on the side (ie an older loom upgraded with a Shed Regulator, a ruler or string can be used as described above.
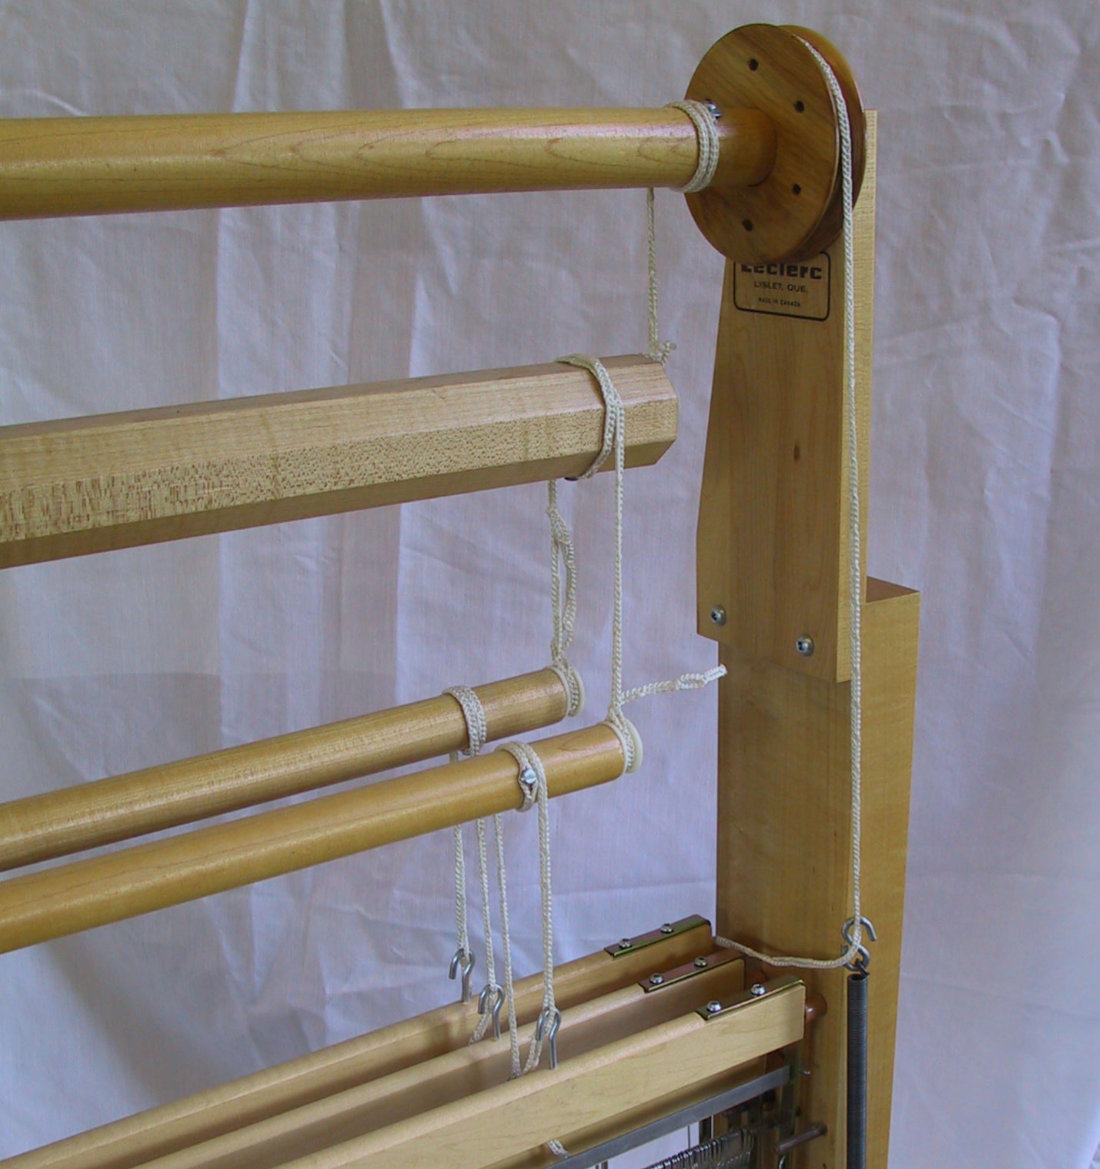
Shortening the cord turns the top Shed Regulator roller winding up the cord to the upper roller, lifting it and the shaft frames. Lengthening the cord where it connects to the spring will lower the shafts.
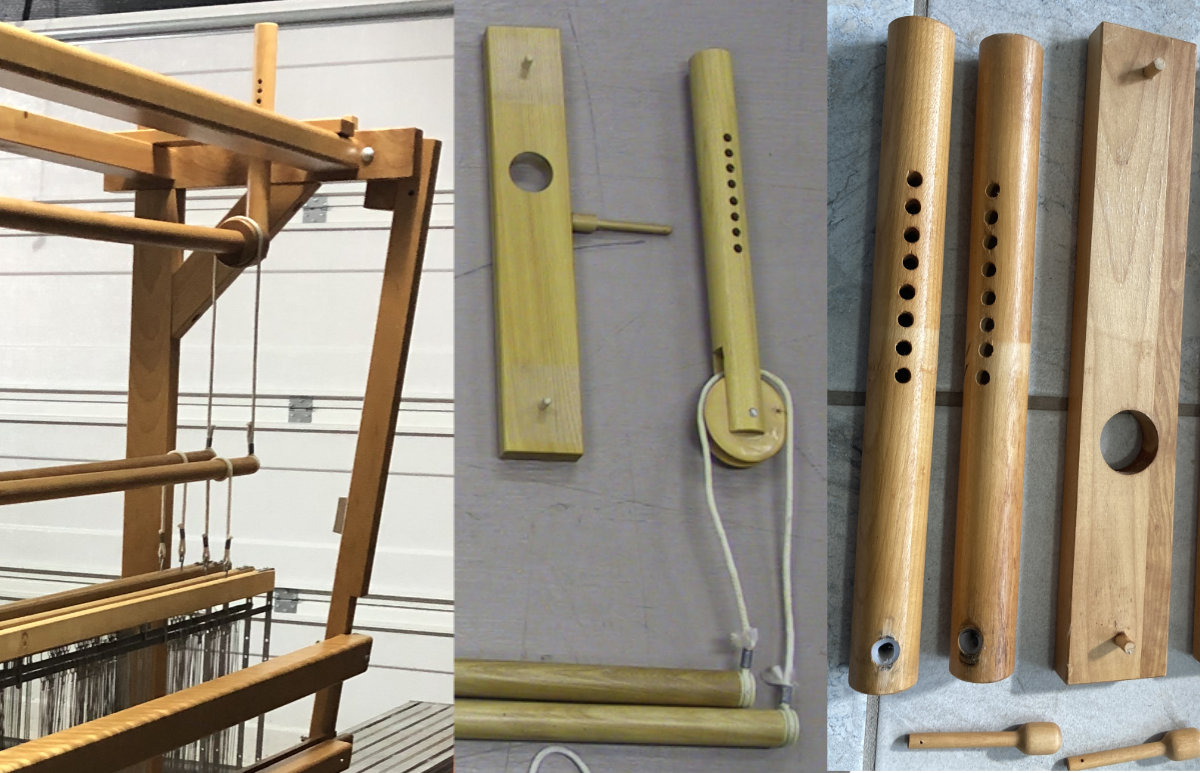
When the Colonial and Colonial I are configured as Counterbalance looms, the upper roller or pulleys can be raised or lowered by moving the pins at the top of the loom on either side. Moving these cause the shafts to raise or lower. On early Colonial models a pair of pulleys hanging from wooden boards at the top of the loom top could be raised or lowered by moving the wooden pegs into different holes. In later Colonial and Colonial I models a similar fitting enabled the upper roller (which replaced the pulleys) to be moved up or down.
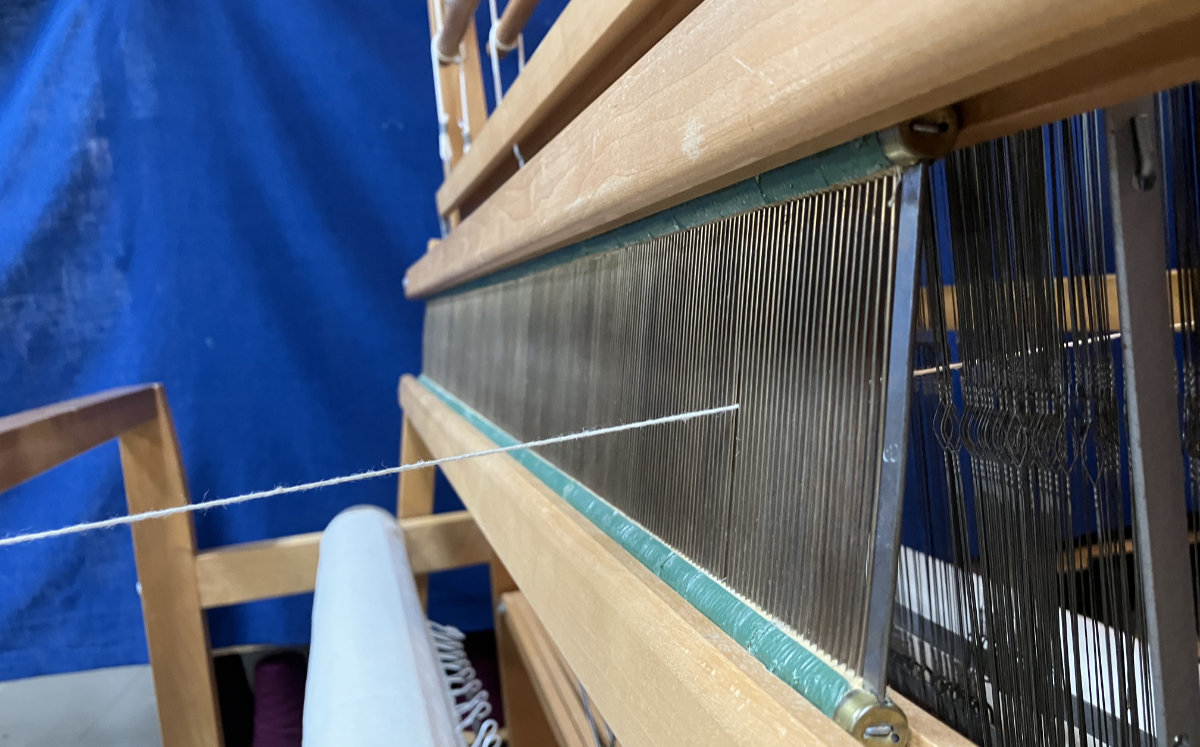
Once the shafts are set properly, it may be neccessary to adjust the height of the beater (if possible). This can be done using a piece of string cannected between the front and back thread beam as before but this time threading it through one of the Heddle eyes and through a dent in the reed. It can also be adjusted after the loom is warped using the warp threads.
When the beater is pressed up against the castle, the warp threads should be positioned in about the middle of the reed halfway between the top and the bottom. This position ensures that the warp threads can move the maximum amount up as well as down to create the shed.
The vertical wooden sword on each side of the beater on newer Fanny, Mira and Colonial I looms are attached using a Beater Sword Mounting Plate. The two nuts on the inside of these plates can be loosened and the whole beater can be moved up or down. On older looms without these plates, the swords can be cut a few inches shorter and the plates can be added.
Leclerc designed these plates to allow the same wooden swords to be used for the beater on the Nilus Jack as well as the Fanny and Mira Counterbalance looms. They allowed the beater height to be set high for the Jack models to position the warp at the bottom of the reed or low for the Counterbalance models to set the warp in the center of the reed. See the note here for more information on positioning these.
On the original Colonial Loom the base of the sword is fixed but the horizontal wooden battens above that hold the reed are attached to slots in the swords which allow the battens to be moved up or down (left picture below).
On the earlier version of the Nilus II loom there are two holes in the bottom of the loom frame which the beater swords can attach to. It is important to make sure the lower hole is used for the Counterbalance loom. The upper hole is used when the loom is configured as a Jack loom (right picture below).
 |
NEED HELP? Contact us for help in answering questions about these products or for help recommending a loom matched to your weaving level and needs. See our Leclerc Loom Comparison Chart for more help in deciding which loom is right for you. |
|
How to Order: Orders may be placed using our secure Online Order Form (this form should open in another window). Click Here for more information on how to place an order as well as our terms and conditions. Payment/Currency: Payment can be made using VISA or Mastercard, Cheque or Money Order in US or Canadian funds. US credit card purchases are billed directly in US funds eliminating any foreign currency conversion charges by the credit card company. Product Directories If you are looking for other items on our website, try using our product directories to quickly find what you are looking for! Our products are grouped as follows: Weaving/Spinning Product Index Books, Magazines & Videos. |
Price/Shipping Quote? If you would like an exact quote for any items complete with shipping costs, please call or email us at nmanners@camillavalleyfarm.com with you location and we will provide this. Gift Certificate If you are looking for a gift for a Knitter or Weaver and can't figure out what they want, a Camilla Valley Farm Gift Certificate is an excellent way to ensure you get the perfect gift! We can also email gift certificates if you are running out of time! Latest News/Updates Keep up to date with what is new at Camilla Valley Farm by following us on Instagram! (Click on the logo below)  |