The Counterbalance loom design operates by moving some warp threads up and the rest down to create a "shed" for the weaver to throw a shuttle with the weft threads through. When the weaver depresses a treadle, they pull one or more shafts down and a set of rollers at the top of the loom cause the other shafts to rise. The force on the mechanism exerted by the warp threads being stretched cause the shafts to move up and down in such a way that the warp threads on the top and bottom of the shed are parallel to each other and a large amount of space is available for the weaver to throw the shuttle through.
To see how the Counterbalance mechanism operates, this video shows the 6 different balanced shaft combinations. Note that treadling an un-warped Counterbalance loom makes the loom appear to be broken unless the operator puts their hand on the top of the shafts and applies a little downward pressure to simulate the warp tension
This design works well as long as main forces being applied are the warp tension and the weavers foot depressing the treadle and the mechanism is relatively frictionless. If however the mechanism (ie upper rollers) contributes to the forces involved by adding more forces, the pressure required by the weaver to depress the treadle will increase and the shed may not be as "clean" with warp threads not being parallel.
Because of this, Leclerc has made a number of improvements over the years to their Counterbalance mechanism to make it easier for weavers to depress the treadles and produce a "cleaner" shed. These improvements reduce the forces in the Counterbalance mechanism and can be added to almost any of the Mira and Fanny models made over the years as well as the earlier "M" and "F" type looms.
Note: More information on adjusting these looms can be found in our Counterbalance Loom Configuration Guide.
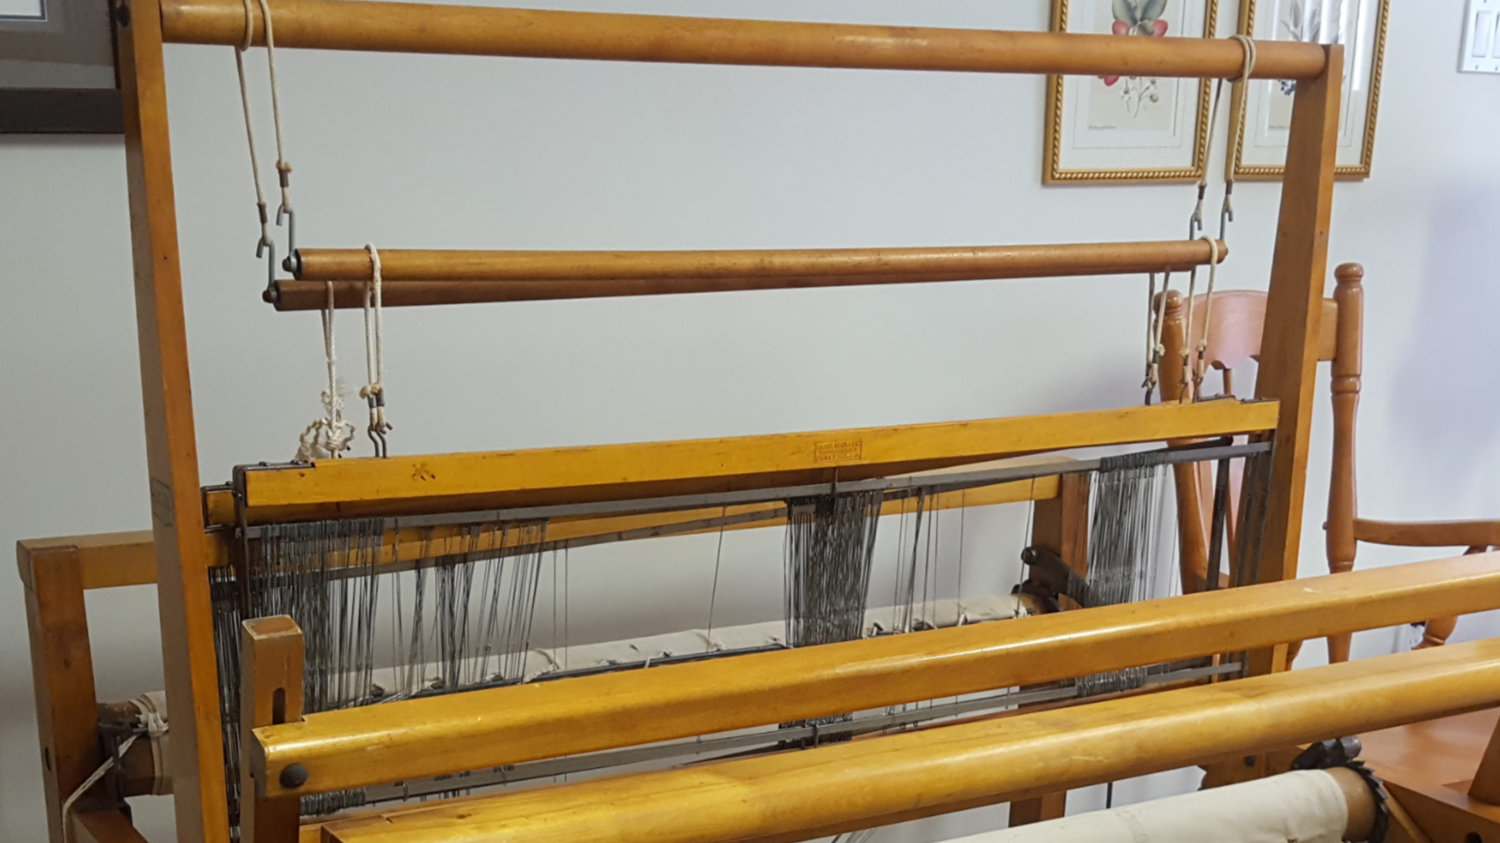
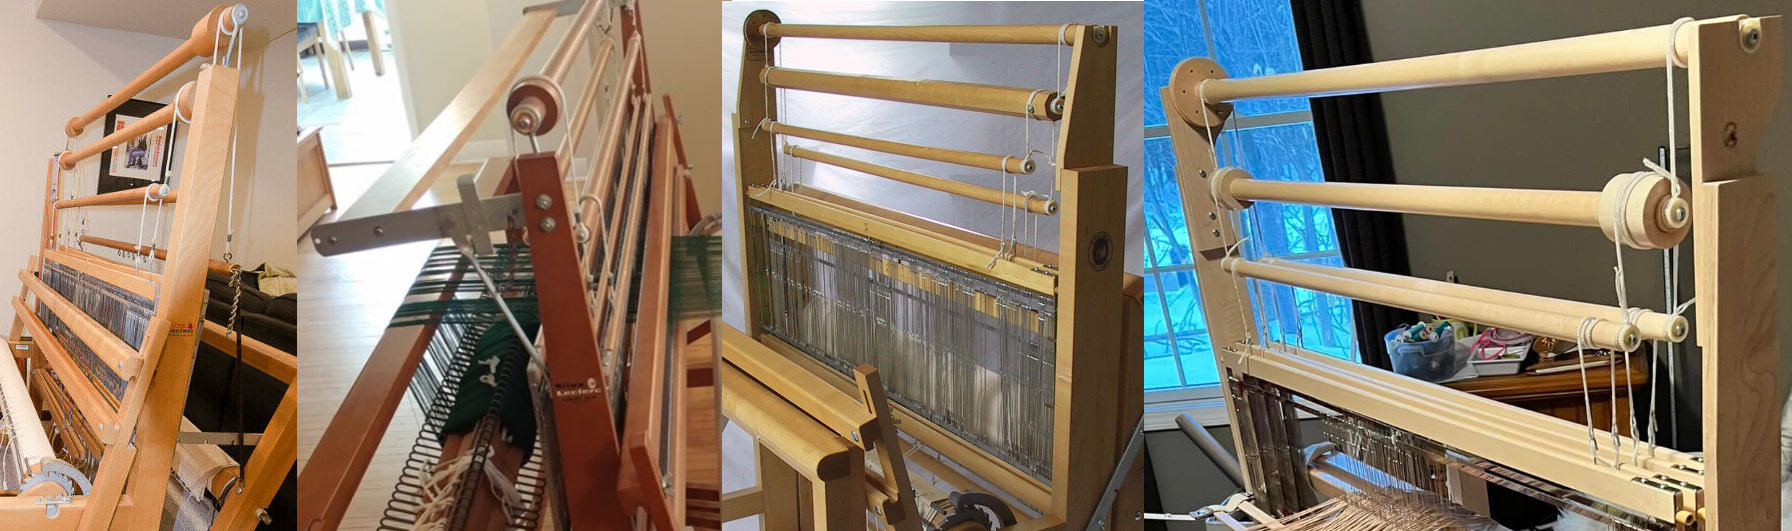
The original Leclerc Counterbalance design had a wider diameter roller on the top with two shorter narrower rollers hanging from it with a pair of cords, one on each side of the loom. A pair of shafts hung from each of these lower rollers with a similar pair of cords. The upper roller length matched the inside width of the loom frame so that a screw in either end of the roller went throught the vertical posts on each side allowing the upper roller to rotate. The lower rollers had a hook screwed into each end to attach the cord from the upper roller.
The Upper roller has a larger diameter to make it easier for it to rotate when the cords pull down on it. The greater diameter of the roller allows to cord to apply more force and reduces the amount the roller has to turn, however the increased diameter increases the weight of the roller making it harder to turn. In the early 1950's Leclerc reduced the weight of the upper roller while increasing the effective diameter the cords were wrapped around by replacing the Upper Roller with a narrower one that had two larger diameter sections for the cords to wrap around.

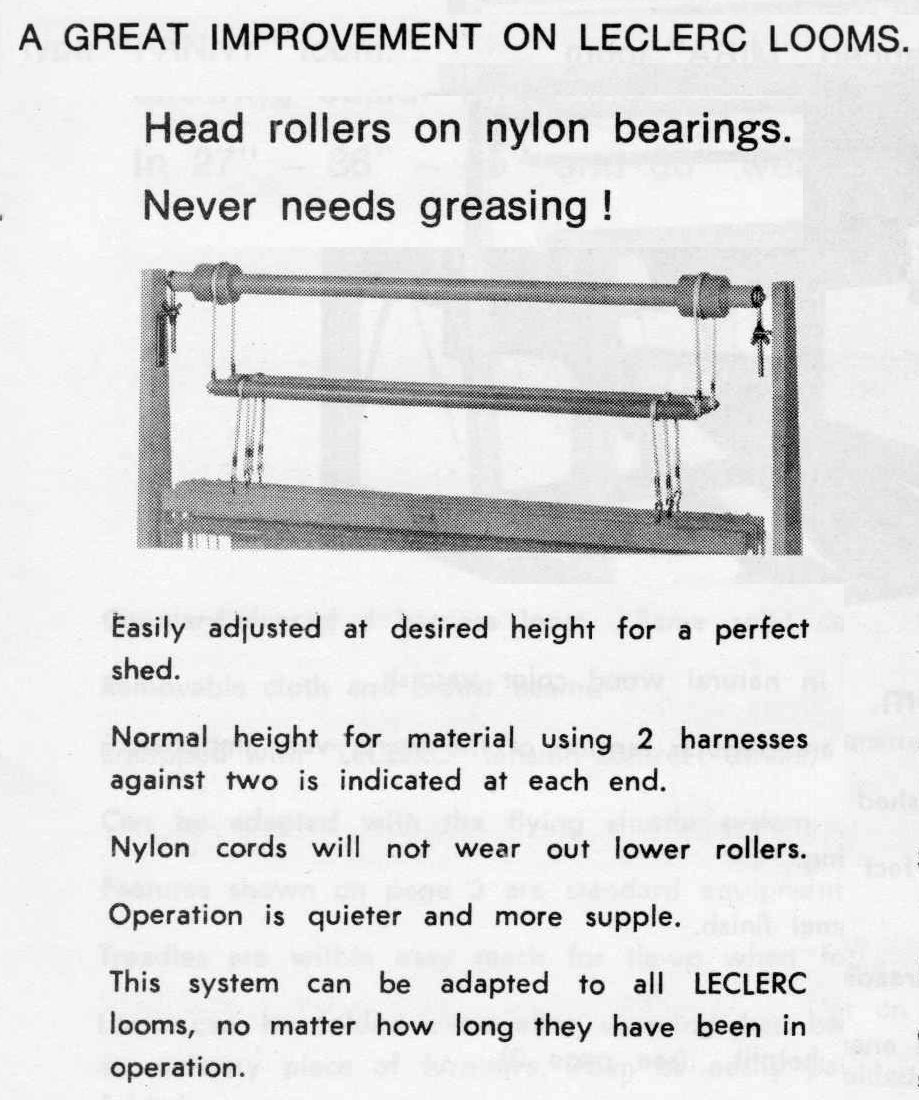
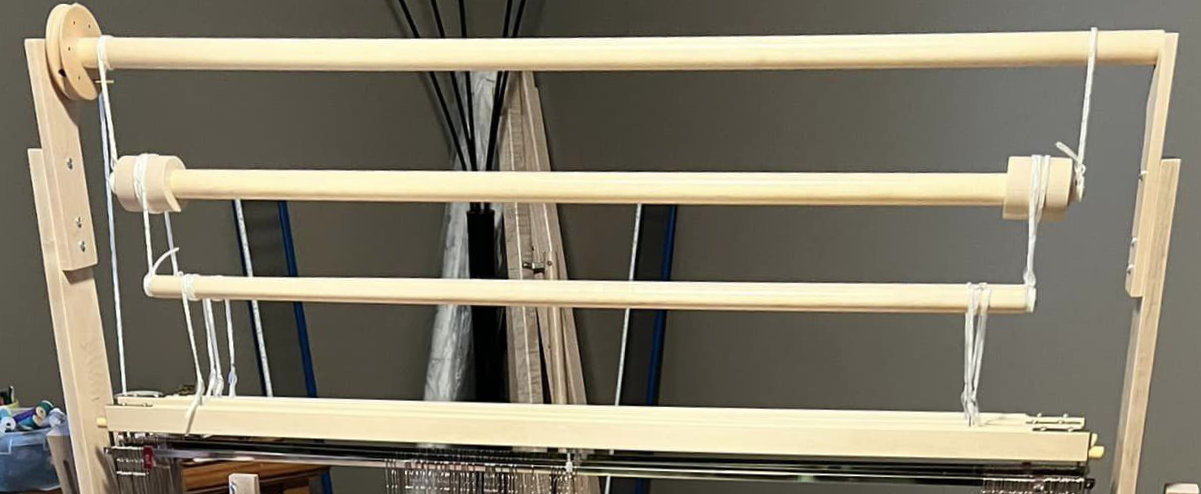
At the end of the 1960's Leclerc further improved the design by shortening the Upper Roller a few inches and instead of directly attaching it to the vertical post on either side, they added a metal bracket with a Nylon "bearing" for the ends of the roller to attach to on each side.
This greatly reduced the friction at the ends and made the roller much easier for the cords to turn improving the shed and reducing the force the weaver had to apply to the treadles. They also added the Nylon Bearing to the cords removing the hooks at the end of the lower rollers making them easier to turn.
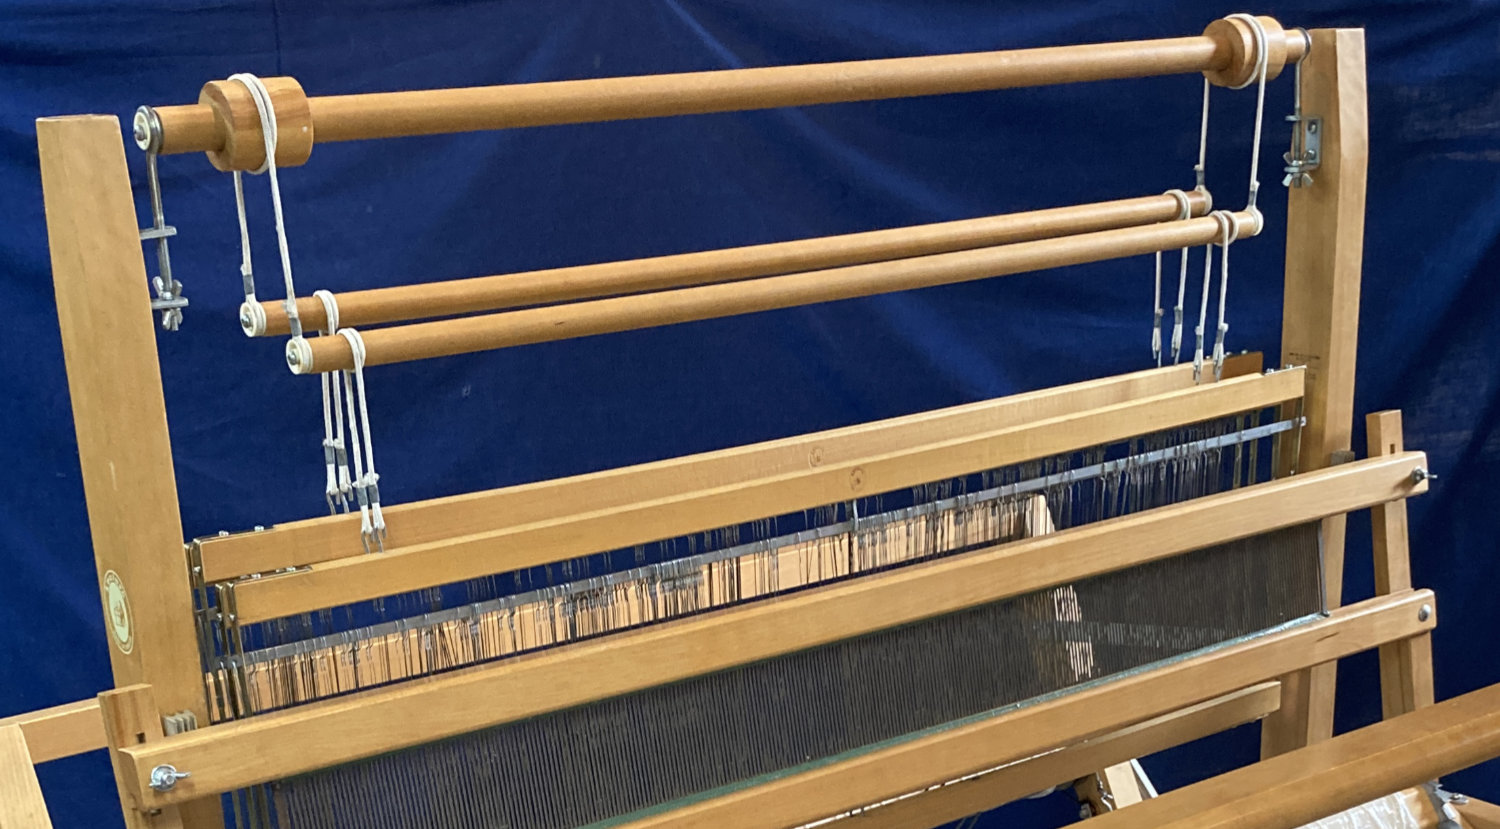
This new design also allowed the weaver to easily adjust the height of the upper roller and the shafts so the warp threads were positioned to go through the reed at the optimum height. This height adjustment can also help with some unbalanced weaves.
Note that Leclerc originally used a "L" shaped bracket and later replaced it with a "U" shaped one. The Upper Roller Cords for these two versions are slightly different in length.
Any of the Mira and Fanny loom variants can be upgraded to this design by shortening the upper roller by trimming a short amount off the ends and adding the brackets.
The catalog at this time highlighted this improvement as well and noted that there was no need to grease the end of the upper roller to reduce the friction.
While the Counterbalance loom works optimally for balanced weaves (ie. 2 shafts down and 2 shafts up) it can be harder to weave unbalanced weaves (ie. 1 or 3 shafts down) as the Roller mechanism will move the center of the shed up or down.
On a Counterbalance loom the warp threads are positioned at the midpoint between the top and bottom of the reed. When the weaver depresses a treadle to open the shed the warp threads are either raised or lowered and centering the warp in the reed allows for full movement up and down. On unbalanced weaves when the midpoint moves up or down, the upper or lower edge of the reed is closer and the warp threads will touch one of these when the treadle is depressed. As soon as the base of the shed hits the bottom of the reed or the top of the shed hits the top of the reed the force required to continue to depress the treadle increases dramatically.
Some weavers find that they do not have the strength in their legs to create a usable shed and those that do find the shed is much smaller than the normal shed they get with balanced weaves.
To deal with unbalanced weaves, Leclerc has provided an optional Shed Regulator mechanism that raises or lowers the whole roller assembly to keep the shed positioned at the optimum height when an unbalanced pattern is being woven. Early versions required cords from the shed regulator to be connected to specific treadles but the current implementation is automatic and does not require the weaver to connect anything. Click here to see all the different versions.
To see more details on how the Shed Regulator works, see the Shed Regulator Operation Guide.
While the Shed Regulator was an option in the past, it is now included as a standard feature of the Leclerc Fanny II, Mira II and Nilus II Counterbalance looms.
The Shed Regulator Option can also still be purchased for any older Fanny, Mira, F-Type or M-Type and because it includes all the parts above the shaft frames, it doesn't matter which version of the Upper Roller is on the loom currently.
There are a number of options to upgrade the functionality of older Fanny and Mira style looms.
- The upper roller on the original design can be replaced with the new version with the larger diameter sections, but because the upper roller Leclerc uses now is a few inches narrower then the space between the loom uprights, the mounting brackets must also be added to attach the upper roller to the side frame uprights as shown in the "Nylon Bearings and Mounting Brackets" section.
- If the loom already has the newer upper roller with the larger sections, the mounting brackets can be added to the loom by shortening the upper roller a few inches by cutting off a small piece at each end and drilling new holes.
- In many cases the Roller Cords may need to be upgraded to the new length although improved cords are available for the original designs with the longer roller that replace the hooks and allow the shaft height to be adjusted by changing the upper cord length.
- The other option is to upgrade to the Shed Regulator which is more expensive compared to the total cost of the roller, brackets and cords but adds functionality in terms of making unbalanced weaves more manageble. The upgrade kit can be purchased for any older Fanny, Mira, F-Type or M-Type and because it includes all the parts above the shaft frames, it doesn't matter which version of the Upper Roller is on the loom currently.
 |
NEED HELP? Contact us for help in answering questions about these products or for help recommending a loom matched to your weaving level and needs. See our Leclerc Loom Comparison Chart for more help in deciding which loom is right for you. |
|
How to Order: Orders may be placed using our secure Online Order Form (this form should open in another window). Click Here for more information on how to place an order as well as our terms and conditions. Payment/Currency: Payment can be made using VISA or Mastercard, Cheque or Money Order in US or Canadian funds. US credit card purchases are billed directly in US funds eliminating any foreign currency conversion charges by the credit card company. Product Directories If you are looking for other items on our website, try using our product directories to quickly find what you are looking for! Our products are grouped as follows: Weaving/Spinning Product Index Books, Magazines & Videos. |
Price/Shipping Quote? If you would like an exact quote for any items complete with shipping costs, please call or email us at nmanners@camillavalleyfarm.com with you location and we will provide this. Gift Certificate If you are looking for a gift for a Knitter or Weaver and can't figure out what they want, a Camilla Valley Farm Gift Certificate is an excellent way to ensure you get the perfect gift! We can also email gift certificates if you are running out of time! Latest News/Updates Keep up to date with what is new at Camilla Valley Farm by following us on Instagram! (Click on the logo below)  |